DOM element class attributes are not only used as ‘hooks’ in CSS to create selectors by which developers and designers style pages, they are widely used in JavaScript for DOM programming. They are an integral part of front-end web development, and used by developers on a daily basis.
Hitherto, working with classes natively has been arduous. This has contributed to the rise in popularity of libraries that provide helper methods. jQuery for example, provides addClass(), hasClass(), removeClass(), and toggleClass(). These methods make working with classes a breeze. Surely, these methods should be available natively. Well, guess what? In addition to an array of new JavaScript APIs, HTML5 replenishes native JavaScript with classList.
The classList object provides the add, remove, contains and toggle methods to facilitate easy and quick class manipulation natively by developers. Let’s explore.
elem.classList
The classList object has the following properties: {
length: number, // returns a class count
item: function(){ }, // index
contains: function() { },
add: function(){ },
remove: function(){ }
}
elem.classList.contains(class)
The contains() method is used to check whether a class exists on the node or not. It returns a boolean value; true or false.
usage: var myElem = document.querySelector(‘#wrapper’);
myElem.classList.contains(‘parent’);// returns true or false
elem.classList.add(class)
The add() method, as you might have gathered, adds a class to the selected node.
usage: myElem.classList.add(‘new-class’);
elem.classList.remove(class)
Conversely, the remove() method removes the ‘passed’ class from the selected element.
usage: myElem.classList.remove(‘new-class’);
elem.classList.toggle(class)
Yes, you guessed it, the toggle() method adds and removes the class. So, if the class exists, it is removed, and vice versa.
usage: myElem.classList.toggle(‘my-class’);
This is predominately used with events such as click and hover.
Browser support
classList is well supported in modern browsers and as of this writing, according to canisue.com, global browser support stands at 75.6%. If you are supporting legacy IE, be sure to use a fall back for IE9 and below.
In a world where instant gratification is paramount, it is imperative that our web applications are optimized for speed and performance. HTML5 has two features that many developers are unaware of, namely prefetch and prerender. ‘Excuse-moi?’ I hear you say. Well maybe not in French, but you know what I mean. Let me elaborate.
Link prefetching and prerendering
The prefetch HTML5 feature allows the developer to silently fetch a page or asset as soon as the page loads. This page or asset will therefore instantly load when the user makes the request via a designated link. This feature only fetches that exact specified resource (URL).
Content prefetching and prerendering can be invaluable in dramatically speeding up your website by shaving off valuable milliseconds on http latency.
This dramatically improves load speeds of your pages and is especially useful for mobile applications.
Prerender on the other hand will render the whole page in the background albeit with some limitations. Use these features sparingly however, as over use can prove counter productive (Well, like anything in life, too much of anything is…). Only prerender pages that are likely to be visited by the user. And the code? In the head section of your web page, add the following code replacing the href values with your own.
Adding the code above to the head section will prerender the about-me.html and prefetchmy_logo.png in the background as soon as the page loads making those two items available as soon as they are requested. Since a round trip to the server is not required when the user clicks on the about me link, the page will load almost instantaneously.
DNS Fetching
In order to reach a given hostname, the browser needs to do some work to resolve the underlying domain or DNS. This has a speed overhead. DNS prefetching allows you to manually specify which domains to prefetch and here is the magic:
In the code above we are explicitly telling the browser to resolve the two domains. This is all done in the background unobtrusively and in turn improving HTTP latency.
Google uses prefetching on its results page to provide instant pages. As soon as you enter your search query and Google is fairly certain of what you are looking for, it starts prerendering the pages using the techniques above. So when you click on any of the results, the page appears to load almost instantaneously.
Support and implementation of the above features is still in flux but, here is a simple guide to follow;
If you want to prerender a page in browsers that support this feature (Chrome), and prefetch in other browsers (Firefox and IE9+), you can pass both features in the rel attribute. <link rel=”prefetch prerender” href=”…” />
In conclusion, patchy support should not stop you from using these and other HTML5 features in your projects, as long as you provide a fall back where possible for browsers that do not support a given feature.
I speak for many a developer when are I say that until recently, web forms were one of the most mundane and uninspiring elements of a web page. As a matter of fact, I had disdain for creating and using web forms. But thanks to an array of HTML5 form attributes, input types and elements this is no longer the case. In this post I am going to focus on the datalist element.
The datalist element enables you as a developer to provide a predefined list of values to the user as well as allowing them to enter their own. The datalist element is used with an input element using the list attribute, to link it to the datalist. For example; <input value=”” list=”fruits” />
<datalist id=”fruits”></datalist>
The list attribute above links the input field to the datalist via the datalist id, in this case id=”fruits”.
You can then nest options inside the datalist element. Let’s have a look at a handful of examples.
input[type=text]
For text input fields, the datalist element allows us to set a predefined list analogous to a drop down list. The user is however not limited to the predefined list items. Unlike the drop down list, the user can still enter items not on the list, as I illustrate in the demo below.
Most modern browsers handle the date input field well. datalist takes it that one step further by allowing you to add suggested dates and specify labels.
If you are not familiar with range input type, it allows the user to pick a value from a given range. You can extend this with our new found friend datalist, by setting predefined markers of values for the user to pick from.
input[type=range] is not available in this browser
This is another HTML5 input field that allows the user to select a colour from a colour picker. The datalist element can be used to provide a predefined list of colours.
input[type=color] is not available in this browser
Akin to the date input field, the week input type allows the user to pick weeks rather than days. With the help of datalist, we can again give the user a list of weeks to pick from.
input[type=week] is not available in this browser
<input type="week" list="weeks" />
<datalist id="weeks">
  <option label="14th Week of 2013" >2013-W14</option>
  <option label="15th Week of 2013" >2013-W15</option>
  <option label="25th Week of 2013" >2013-W25</option>
  <option label="52nd Week of 2013" >2013-W52</option>
  <option label="30th Week of 2013" >2013-W30</option>
</datalist>
Conclusion
I hope that gives you an insight in the datalist element. There are more input field types that can be linked to datalist element. I have only scratched the surface above to demonstrate its use.
Unfortunately, support for input types introduced in HTML5 is sparse, especially by Internet Explorer, where even IE10 has only implemented a handful of them. Since the datalist element is inextricably linked to input fields, you will find usage is currently limited. This however doesn’t mean you shouldn’t use these new funky elements as long as you have provisions (gracefully degrade) for unsupported browsers.
Location, location, location. No, I am not writing about real estate but rather a new HTML5 API that empowers developers by giving them the ability to get the geographical location of a user. In this post, I will cover the basics of the API – mainly how to get started – and I have also put together a demo to boot. The demo shows your approximate current location.
Geolocation makes the user’s location co-ordinates available to JavaScript which can then send them back to the server. This information can then be used by the developer to personalize user experience and tailor content for the end user based on location. Many retail sites, for example, tap into the geolocation API in conjunction with the Google maps API to show the user a nearby store.
Note: The browser or device must get express permission from the user before disclosing their location.
All modern user agents, otherwise known as browsers, have implemented the API, albeit the implementation is still in flux. The browser or device must get express permission from the user before sending their location co-ordinates, which comes as a relief to many users who would rather not share their location with a web site or application.
Get current position
In its simplest form, the geolocation function is; function getLocation(){
navigator.geolocation.getCurrentPosition(showMap)
}
Unfortunately, since the API is not implemented across all browsers at the time of this writing, we have to make provisions for antiquated browsers. This is where a really handy feature detection library called Modernizr (If you are not using it, you should) comes to the rescue. We can use Modernizr to test for geolocation support, providing a fall back where the API is not supported. Let’s rewrite the above code; function getLocation(){
if(Modernizr.geolocation){
navigator.geolocation.getCurrentPosition(showMap)
}else{ //no support, provide a fallback. Maybe
}
}
What happens behind the scenes
Remember for the browser to send the user’s location, the user must grant permission. So when you call getCurrentPosition() method the following happens;
The user will get a prompt alerting the user of the fact that the website wants to know their location
The prompt will request the user’s consent to share their location
The method is ‘blocking’ so the website cannot bypass it
Below is an example of a prompt you get in Chrome;
Getting the user’s co-ordinates
If the user consents to sharing their location, the callback (I have called mine showMap) will fire. The callback takes one argument which is an object that contains both the coordinates and a timestamp. Let’s write the showMap function; function showMap(position){
var latitude = position.coords.latitude;
var longitude = position.coords.longitude; //we can place the map on the canvas
}
The position object passed as a parameter in the showMap function consists of the following properties;
coords.latitude – degrees
coords.longitude – degrees
coords.altitude – meters
coords.accuracy – meters
coords.altitudeAccuracy – meters
coords.heading – degrees clockwise
coords.speed – meters per second
timestamp – similar to the Date() object
Now, working on the premise that geolocation works on a opt-in basis, we have to be prepared for some error-handling in the event that the users decides not to share their location. The second argument to our getCurrentPosition() method, is the error handling callback. So let’s update our function to that effect. navigator.geolocation.getCurrentPosition(showMap, errHandler)
If there is a problem, the errHandler() callback will fire. The error handler has a PositionError object which is one of the following;
PERMISSION_DENIED(1) – The user has denied you access to their location
POSITION_UNAVAILABLE(2) – The network is down
TIMEOUT(3) – It took too long to calculate the user’s position
Above codes in hand, we can handle all three cases as we see fit. For example, if the user opts not to share their location, our error handler would be something like; function errHandler(err){
if(err.code == 1){ //user said nada
}
}
The getCurrentPosition function takes a third optional argument called PositionOptions. This is an object with three properties namely; enableHighAccuracy, timeout and maximumAge. As you can deduce from their names, enableHighAccuracy provides as an accurate a result as possible. If set to true, this might however result in a slower response. Timeout is the number of milliseconds your application is willing to wait for a calculation, and maximumAge allows the application to use a cached position within a specified time frame. I illustrate one of the three optional properties below; navigator.geolocation.getCurrentPosition(showMap, errHandler, {maximumAge:85000})
Cross browser support
Most modern browsers including IE9 and above support geolocation natively. However, if you are still supporting legacy IE (IE8 and below) do not despair. Help is at hand in the form of geoposition.js.
Geoposition.js
Geoposition.js is a geolocation polyfill that not only simulates the functionality in legacy IE, it also standardizes implementation across the numerous platforms, mobile included. To use the library, simply download the script from github and call it from within your document. Remember it is a best practise to add your scripts at the bottom of the body section even though technically, you should add them to the head section. While scripts are loading, they will stop the rest of the page from loading (also referred to as blocking). By adding them to the bottom of the page, you avoid this.
Once you have the script in place, you are now ready to use geolocation with assurances that it will work cross browser and cross platform.
Implementation
To initialize geolocation, do the following; if(geoPosition.init()){
geoPosition.getCurrentPosition(successCallback, errCallback, {enableHighAccuracy:true})
}else{ //geolocation is not available on this device or browser
}
We can now write the succesCallback and errCallback functions.
Success callback
function successCallback(p){ //p : the the geolocation object as the passed argument //p.latitude : the latitude value //p.longitude : the longitude value value
}
Error callback
function errCallback(p){ //p.message : the error message
}
The API is well documented on github, so if you are interested in all the bells and whistles, read the documentation.
Demo
To quickly demonstrate geolocation, if the user’s browser or device supports geolocation, I have added a simple link to this page and attached a click event listener. When the user clicks the link, the geolocation function is called and the magic happens. Otherwise, I simply display a “your browser doesn’t support geolocation” message. GIVE IT TRY!
Note: Remember to drop in at the google developers page to grab an API key which you will need use google maps in your projects.
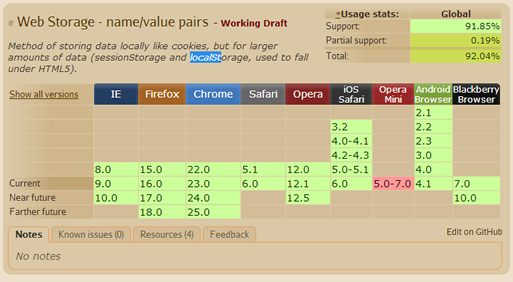
Here is a scenario that we can all relate to; You are filling in a long form and half way through, you inadvertently close the tab/window or worse still your laptop decides to crash. ‘Argh!, I was half way through that form, now I have to start again?’ comes to mind. Well, fret no more. Thanks to the localStorage API we can store form values (and more) on the fly so that in the event that the above happens, the values already entered will still be in browser memory. Storing persisting data has never been easier, and it lends itself well to enhancing user experience. I can here you say, but isn’t that a cookie? No way Jose! Sit back, relax and enjoy the ride!
What is this localStorage API thingy?
Simply put, localStorage is a JS API (commonly referred to as part of the HTML5 spec) that facilitates data storage in the browser. This is in form of key/value pairs that persist even when the user navigates away from the page. Persistence is where the similarity between localStorage and cookies ends. Not to be presumptuous, key – A name for a value to be stored.value – The value stored. Unlike Cookies,
localStorage does not expire, Cookies do
the localStorage API recommends up to 5MB, Cookies are small(approx. 4kb)
The localStorage API is very easy to work with as it’s simply a JavaScript object made up of key/value pairs, Cookies are messy NOTE: even if an object, the localStorage object can only store simple data types i.e strings, numbers and floating points.
localStorage is not sent in HTTP requests, Cookies are. This adds an overhead to your web application as unnecessary requests are made to the server.
localStorage can be accessed via the global window object and is supported in the latest iterations of all the major browsers, IE included. As a matter of fact localStorage is supported as of IE8. To test for localStorage support, simply let Modernizr (you should be using it) do the detection for you, here is how; if(Modernizr.localstorage){
//browser supports localStorage
}else{
//browser does NOT support localStorage
}
You however do not have to use Modernizr to test for localStorage support. You can simply check if the window object has the localStorage property; if(window.localStorage){
//browser supports localStorage
}else{
//browser does NOT support localStorage
}
but then again, Modernizr aids the detection of all the other cool progressive enhancement features, so why not take advantage.
Crash course over!
So how do I use this nice API to save form data?
As I alluded to above, the localStorage API makes working with persistent data a breeze. It’s also very easy to implement. So without further ado, here we go;
localStorage implementation
if(Modernizr.localstorage){
//browser supports localstorage$(function(){
//lets store input field data in a field on blur.
$('form').on('blur', 'input', function(){
//set a flag to indicate that we have saved data!
localStorage.setItem('flag','formData');
//lets serialize the form data using jQuery's serializeArray()var data = $('form').serializeArray();
//lets loop through the data and save the input data$.each(data, function(i, obj){
localStorage.setItem(obj.name, obj.value);
});
});
/*--------------------------------------------------------------
| if saved form data exists set input field values. | Note: this will naturally run before the above code | which is only triggered on the blur event.--------------------------------------------------------------*/
if (localStorage.getItem('flag')){
var data = $('form').serializeArray();
$.each(data, function(i, obj){
$("[name='"+obj.name+"']").val(localStorage.getItem(obj.name));
});
}
});
}else{
//NO native localStorage support - resort to a fallback eg $.localStorage()
}
In the above snippet, we test for localStorage support which if successful, and after the DOM is ready, we use the blur event to trigger localStorage, calling the setItem() method in particular. This little number will create key (obj.name), value (obj.value) pairs for all input fields other than the submit button and store these as an array of objects stored in browser memory. We do this by iterating through the serialized form data. In layman talk, every time the user moves away from a field we tell the browser to store the values in the input fields.
Great! We have now stored the data, but how do we then retrieve this data? Before we retrieve the data and populate the respective fields, note that we set a flag if localStorage.setItem() has been invoked on the form data. We can then maybe alert the user that form data was saved last time they filled in the form, but we can also use this flag as a test for presence of saved data. We then serialize the form data so that we can loop through it and set the values of the input fields. Note that instead of invoking the setItem() method, we are now calling upon its sibling getItem().Voilà! Easy as pie.
Being the nice developers that we are, we can also provide a way for the user to clear the form fields if they so wish, by simply adding a button to clear input data. The click event handler for the button will be something akin to;
On clicking the ‘clear button’ the value of the flag will be set to empty string which is a falsey value. Consequently, when the user reloads the page, the code that sets the input values to the stored data will not execute/run.
Browser support
Summary
The fact that the localStorage interface is a lot easier to use compared to the now ageing cookies, is the reason this API has had rapid adoption by many in the development community. There are many applications for localStorage but I have used persisting form data as a way of whetting your appetite and I implore you to explore this cool API further. Hopefully, this will make storing and working with client-side data a tad bit easier.
That said, localStorage should be used judiciously and users should always be made aware that their data is being stored albeit to improve user experience. Don’t forget those disclaimers!
If your web application takes more than 3 seconds to load, you will soon get a call from the the latency police to explain yourself. Users expect snappy applications otherwise they will move on to the next website with better user experience. For businesses, you can not overstate the importance of fast applications as this could be the difference between success and failure. One of the reasons most web pages take a long time to load is the amount of requests made by the browser and the size of the files that need to be pre-loaded. Reducing the amount of requests, is at the core of improving user experience.
Recently in my day job, I was assigned a task of creating a prototype to demonstrate responsive images. Fishing rod in hand I headed off fishing for some new techniques. There is no shortage of server and client side techniques but I settled for PictureFill.
What is PictureFill?
PictureFill is a responsive image technique devised by Scott Jehl that makes use of the proposed picture element and media queries to serve images based on browser window size.
How does it work?
An img element is created on the fly using JavaScript based on the source and media query specified within the picture element. This prevents unnecessary overheads that are otherwise incurred by pre-loading large files, especially on small or low speed devices.
Implementation – Some code please!
Head off to the Github code repository and download the code files. The code is very well documented and includes examples. I will nonetheless give a quick run down on the html markup.
In the snippet above, I use the picture element to nest all the various image sources using, well the source element. Note that I also specify the screen resolutions using media queries passed as values for the data-media attribute. The beauty here is the ability to cater for as many screen resolutions as you want.
For users with JavaScript disabled, we have a fallback image which is wrapped in noscript tags. This piece of code will not be executed by browsers running JavaScript.
Well as usually, IE demands special treatment. Using IE conditional comments we can provide a one-size-for-all image for IE8 and below as Media Queries are not supported here. For example if I wanted to serve the medium image to IE8 and below, I can nest the following inside the picture element: <!–[if (lt IE 9) & (!IEMobile)]>
<source data-src=”img/thumbs/pebbles_medium_thumb.jpg”></div>
<![endif]–>
If you are understandably apprehensive about using the picture element as it’s still in draft status with the w3c, you can replace the picture and source tags with the div element. Remember however to make the switch in the JavaScript as well i.e replace all the picture instances with div. My take on standards is that; they do not really mean that much if the browsers do not implement the module in question. After all users are not concerned about whether the your code is legal or not. That’s not to say that we should totally disregard semantics and standards. Word is that a few browsers have began implementing the picture/source model.
Summary
To many this might seem a very involved workaround to a problem that does not yet have a standardized solution, but until a fix comes along, this is a semantic workaround for the purist. As I mentioned earlier, there is no shortage of polyfills and workarounds in the web dev community, but this by far gets my vote.
Internet Explorer (IE) has a rather unfashionable habit of showing up to the CSS3 and HTML5 party late. Someone ought to tell Microsoft that their browser has caused many a heartache and angst amongst designers and developers who strive for equal user experience for all mankind irrespective of their browser of choice. Rant over!
Let us focus on people that are opting into the future and are ready to embrace new web technologies, moreover Chrome Frame has now been stable since 2010. In an effort to solve the aforementioned annoyance, a few people at Google got together and came up with a rather canny solution; wrap IE in Chrome’s clothing. And Chrome Frame was born.
What is Chrome Frame and why?
Chrome Frame (GCF) is a plug-in that brings new web technologies to IE. As of writing, technologies such as websockets, and canvas are not supported in IE8 and below. Chrome Frame alleviates this problem. GCF not only brings with it all the good CSS3 and HTML5 features that are otherwise not yet supported by Internet Explorer, it brings Chromes’ JavaScript V8 rendering engine which provides better performance, at least in IE8 and below.
This means developers and designers can invest the time otherwise spent fixing and adapting web apps to IE or worse still curtailing functionality and UX for IE users, to developing rich applications.
Chrome Frame is also a saving grace for users that are forevermore doomed to legacy IE because their machines are not running the Windows7 OS and consequently cannot upgrade to IE9+
Tapping into Chrome Frame
Simply adding the http-equiv meta tag in the head section of your document, activates Chrome Frame in IE if the plug in is installed. Browsers that do not understand this tag will simply ignore it. The tag is as follows: <meta http-equiv=”X-UA-Compatible” content=”IE=edge,chrome=1″>
The part to pay attention to is the content attribute. IE=edge will coerce the browser to the latest rendering mode installed if the user or browser inadvertently switches to a older version. chrome=1 as you might gather enables Chrome Frame. You can also load Chrome Frame conditionally. Say you only want to activate it for users in IE7 and below, you would add chrome=IE7 in place of chrome=1.
What if the user does not have Chrome Frame installed?
Well, the user can either do a manual install by simply visiting http://www.google.com/chromeframe or as I demonstrate further below we can add a script that will prompt the user to install the plug in if it is not present.
The beauty of Chrome Frame is that the user does not need administrative rights to install the plugin. Simply append ?user=true to http://www.google.com/ and you are off and running.
Implementing the detection script
In addition to the http-equiv meta tag discussed above, we can add the following script at the bottom (or head section) of our page:
The snippet above is a Chrome Frame detection and install script that will run if the user is viewing your site in IE8 or below. A gentle prompt in form of an overlay page (not a popup) will be displayed to the user. It is really that simple. Note that the CFInstall.check() method is at the heart of this script and takes several properties e.g,
cssText: This is optional and allows you to style the prompt iFrame with your custom styles
onmissing: You can specify a custom callback function if GCF is missing
To DEMONSTRATE, I have put together a simple canvas page and if you run it in IE8 or below and have Chrome Frame installed, you will see my Picaso-esque canvas drawing. Conversely, if you do not have Chrome Frame installed, you will not see that beauty. You will however be presented with an in-line dialog (not the obtrusive popup) to install Chrome Frame. Canvas is just one feature that IE8 and its older siblings do not support, there are many more where that came from.
Summary
Many big corporations and organisations are very reluctant to update to newer browsers citing financial implications to their IT departments and security risks associated with new software that has not been fully tested. These are all plausible reasons but they also hinder advancement in web technology.
Google Chrome Frame is an alternative and is a testament to Google’s enthusiasm and desire to move the web forward. Because IE has a big piece of the user pie but painfully slow at implementing the new web technologies, it cannot be taken lightly and efforts have to be made to drag it along into the future. For users who have made the wise move away from using IE as their primary browser, but have IE dependent applications, there are solutions such as IE-tab that emulate IE in other browsers.
Since jQuery broke onto the scene, which now seems like a century ago, JavaScript libraries have become ubiquitous. Even the biggest fan must admit we are reaching saturation point. That said, there is a gem of a library that every developer must add to their toolbox; this little number goes by the name Modernizr.
What’s the fuss?
Mordernizr was originated by Faruk Ateş but has since got some heavy weights on board such as Paul Irish, and Alex Sextion. Based on the principles of progressive enhancement and graceful degradation, Modernizr detects browser support for the latest web technologies specifically HTML5 and CSS3 features including opacity, canvas, box shadow, svg, HTML5 input types, local and webStorage, geolocation and much, much more. This aids the developer in enhancing their web applications by providing useful information on support of a given web technology without resorting to the generally bad practice of user-agent(UA) sniffing. Conversely, if a certain feature is not supported, Modernizr will enable the developer to target a particular browser by providing a ‘hook’ in the DOM.
So how does it work?
Modernizr adds a CSS class to the root of the htmlelement of your document. So for example if I were working with canvas, it would add a canvas class where this technology is supported and no-canvas where it isn’t. I can then deal with both scenarios accordingly.
Saying that Modernizr is just a feature detection library is however selling it short. It can also be used to conditionally load scripts, build custom tests, and test media queries as I will demonstrate later. In the meantime here is a quick illustration of what Modernizr brings to the table.
Applying canvas using feature detection
No, that is not an image. In the trivial example above, we test for canvas support in the host browser before creating a canvas element and drawing a simple line. If you view this page in a browser that does not support canvas, you will get a friendly message encouraging you to upgrade your browser. In a real application, you might opt for a polyfill as a fallback solution for non-supporting browsers.
So how do I use it?
Modernizr is easy to use.
Step 1: Get a copy of Modernizr
Head off to modernizr.com and grab yourself a copy of the latest version of the Modernizr. You can download the full copy of the library, but chances are you only need a ‘diet’ version. In which case, the site provides a very handy tool that allows you to customize your download.
Step 2: Add to page
Script in hand, lets create a regular html document and add the Modernizr script to the page as we would any other script. Also add a ‘no-js‘ class to the html element. This will be replaced with ‘js‘ if Modernizr is running, but its also a cue to cases where JavaScript is not running and allows you to handle this scenario appropriately.
Voilà! We are good to go. A quick glance at DOM, we see a array of classes added to the html element and the ‘no-js‘ class replaced with ‘js‘. Of course if we only want to test support for a handful of properties/features then modernizr.com provides a tool for configuring your download.
Step 3: have fun
As of writing, canvas is not supported cross-browser so it makes a very good candidate. I will demonstrate both the CSS and JavaScript approaches.
CSS approach
.canvas #square{
  /*-- styles for #square element in browser with canvas suppport --*/
}
.no-convas #square{
  /*-- styles for #square element in browser with no canvas support --*/
}
In the above snippet, .canvas and .no-canvas CSS rules target element #square for canvas and non-canvas supporting browsers respectively. These classes are dynamically appended to the html element by Modernizr.
In the JavaScript variant, all the classes are properties of the Modernizr object making it easy to test for feature/property support.
JavaScript approach
var el = $('#square');
    //Set the background color based on canvas support
    Modernizr.canvas ? el.css({'backgroundColor':'#f0f'}) : el.css('backgroundColor':'#ccc');
}
Note: Modernizr.canvas or any other property on the Modernizr object returns a boolean (true or false). And there you have it. But we are not done yet, there is more.
Load scripts conditionally
Within Modernizr, is a small library called YepNope. This is fundamentally a resource loader that facilitates conditional loading of both JavaScript and CSS files. For example, if we wanted to load FlashCanvas (canvas polyfill) for browsers that do not support canvas, we would use Modernizr as follows:
YepNope will load files asynchronously or in parallel which will make our applications perform better. Be sure to read more about Modernizr.load() as it has more tricks under its sleeve. Some of the useful properties include;
load: loads a script or file and,
complete: a callback function. Analogous to success in Ajax
Testing media queries
Modernizr provides a neat way of testing media queries using JavaScript. Say hello to Modernizr.mq(). This little bad boy takes a media query as an argument and will return a boolean. For example, if we want to improve user experience on a small device by removing certain page elements from small screens, we can do the following;
Modernizr.mq()
if(Modernizr.mq("screen and (max-width:480px)")){
  //remove secondary navigation from small screens
  $('#secondary-nav').remove();
}
Summary
I hope I have managed to whet your appetite enough for you to give Modernizr a try. The library brings a lot to the table and I am sure you will at some point in your projects find it very useful. That said, tread carefully while using it especially when writing CSS. Think of a scenario where the user has turned off JavaScript (yes, people still do), or if the script does not load for one reason or another.
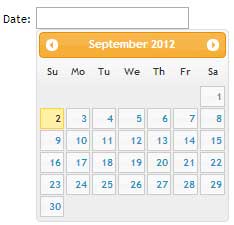
We’ve all seen them around the web. Focus in a date input field, and a calendar datepicker pops up allowing the user to select a date. Until the advent of HTML5 and jQuery UI, developers achieved this rather mean feat by way of manipulating table cells courtesy of JavaScript. Soon enough all modern browsers will natively support calendar datepickers. As a developer all you need to do is add type=”date” to your input field and watch the browser do its magic.
Unfortunately, not all browsers at the time of writing (AHEM, no name calling) support this attribute value. I will therefore make an attempt at saving the world by demonstrating how to implement a datepicker in your form fields (you can not say I did not try) while providing a JavaScript fallback for the those browsers that are yet to implement this attribute value.
In the HTML markup above, we have a simple input field with type=”date”. date is one of an array of new form input attribute values in the HTML5 specification. Try this out in Chrome, Firefox and Opera, and you get a calendar datepicker when the input field is in focus. This is however not the case for Internet Explorer 9 and below.
Show some mobile device love
Mobile browsers, native or otherwise, support most if not all the new HTML5 form input attribute values. This enhances the user experience as the on-demand virtual keyboard provided is appropriate to the input field in focus. So for example; if the input field has type=”email”, you are presented with a keyboard with symbols associated to email addresses e.g @ and the top level domain(.com) in some cases. But I digress, the whole chapter of HTML5 form input attributes warrants its own forum (watch this space).
In our case, the user is presented with a calendar datepicker. The image below is a screen grab from Chrome on a Android device. Splendid indeed eh?
Fallback – Hello IE and such!(Not so much love)
The beauty of the new HTML5 elements and attribute values is that if they are not supported by the browser, they fail silently or defaults are used. In our case, IE just treats it as if it were a text input (type=”text”). However since we do not want to be sued by our friends that refuse to update their browsers or choose to use Internet Explorer, we should strive to offer a similar user experience where humanly possible or degrade gracefully. JavaScript to the rescue. Below is the revised HTML code.
Revised HTML
<!DOCTYPE html>
<html>
<head>
   <title>HTML5 datepicker</title>
   <link rel="stylesheet" href="css/ui-lightness/jquery-ui-1.8.23.custon.css">
</head>
<body>
   <form action="">
      <input type="date" name="date">
   </form>
</body>
<script src="js/jquery-1.8.1.min.js"></script>
<script src="js/jquery-ui.js"></script>

//call the datepicker method on the date input field
<script>
   $('#date').datepicker();
</script>
</html>
jQuery has a user interface library with several ready-to-use plugins/widgets that are easy to implement and make adding common features such as tabs and accordions a breeze. It so happens that the UI includes a calendar datepicker widget that we can use in this case. To add the widget to your web application, stop over at jQuery UI where you will find a demo and documentation. jQuery provides an assortment of themes and you are bound to find one that suits your project.
Once you have decided on a theme, download the library. Be sure to customise your download by deselecting all first, then only adding core jQuery and the datepicker widget as you do not need the entire UI library. Do not forget to choose a theme before you click the download button otherwise your color picker will not have the CSS to your theme of choice.
As you may have noted in the revised HTML code above, I have added the jQuery UI script which has a dependency on jQuery core. I have also added the CSS that will give our datepicker the preferred theme/styling. You are now ready to apply the functionality to your input field.
Now simply call the datepicker method on the #date input field as demonstrated in the code above. You should obviously do this ‘unobstrusively’ by creating an external file, but for expedience and conciseness I have added the code at the bottom of the HTML file. And there it is folks, easy as pie, we have a cross browser datepicker. Yes, it works in IE too. Who knew?
There is however one problem, if you try out our new input field in a browser that supports this feature natively, you will notice that we are getting both the native and the jQuery plugin fallback solution, which is obviously not elegant. To solve this problem, we can add simple feature detection to our code to test weather the browser supports the date attribute value or not.
In the snippet below, we create an element and assign date to the type attribute, if the browser does not understand this value, it coerces the value to text. We then test whether our #date input type is text, if so, only then should we add the fallback. See code below and check out the demo;
Feature detection
<script>
   var el = document.createElement('input');
   el.setAttribute('type','date');
   //if type is text then and only then should you call the fallback
   if(el.type === 'text'){
      $('#date').datepicker({
         dateFormat:'dd-mm-yy'
      });
   }
</script>
Properties
The datepicker method can take an object as a parameter with an array of properties such as dateFormat, autoSize, minDate, maxDate that you can pass to customize the behaviour. For a definitive list, visit the demo URL above and click on options. For instance to set the date format, you would pass dateFormat:’dd-mm-yy’ as shown below
To wrap it up, I would recommend another very nice calendar plugin that I have used in the past by Andy Croxall of the mitya.co.uk fame. Feel free to give it a try.